
How can you make a dress bigger?
- becomingbridalnc
- Nov 26, 2025
- 18 min read
When a bride finds her dream dress, but it is not the right size, what can be done? There are several options for most brides! Based on the style of your dress, we can go over which ones are available for you. Let's jump into it!
Table of contents:
Corset back
Letting the shoulders out
Seam allowances
Gussets (with mention of illusion mesh panels)
Remaking Panels
Corset back
The number one method most brides will have heard of is to add a corset back to your dress. This is the easiest and most straightforward way to help make a dress fit. If you are pregnant or have weight that fluctuates, this is an excellent option for you! The main drawback to this option is that it does not work well on all dress styles. The challenge to adding a corset back is finding or making one that matches or complements the existing fabric. If you have a sheer or lace bodice on your dress, you can’t just put in a satin corset back, as it will not look natural with your dress. The corset back, the modesty panel, and the loops all need to match your dress, or it will be obvious that it was added. When we use a premade corset back, it will be the cheapest option for a bride who needs their dress size altered. If we are making one ourselves, it is more time-consuming and requires us to source matching materials, which adds to the overall alteration time and expense. A traditional corset back looks better with a more formal and structured dress. If you have a dress with a high back, the corset will unfortunately not complement the style. If you’re wearing a slip dress, it also may not complement the gown. The goal when making ANY dress bigger is for the end product to look seamless and like the dress was designed that way originally. You don’t want to ruin the integrity of the design of the dress you originally fell in love with by being able to tell we put in a corset back!
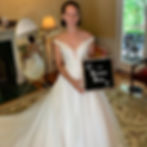
With Becoming Bridal bride Leah, she was a COVID bride who got married in an intimate ceremony and then planned to have a big wedding when COVID numbers were down. She already had her stunning dream dress and thought that was the end of her dress journey. Well, the unexpected appearance of their sweet baby boy threw a spanner in the works! Leah’s body changed with her pregnancy, which is very common. The changes to her body made it so her dress was now inches from closing.


Here you can see how far the dress is from closing.
For her dress, the corset back kit was a perfect match and complemented the style of her dress perfectly! It honestly made her very glamorous dress even more romantic-looking.


Which I mean, look at that dress, who knew it could get even more stunning?!
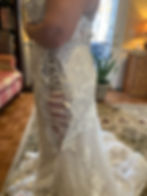
Our beautiful Becoming Bridal bride, Alyssa’s dress was an heirloom piece from her stepmom, and it started out too small. Due to pre-wedding weight loss, she wasn’t sure what size she would be at her wedding, and she wanted a corset back to make sure it would fit. This extra security is an excellent idea for brides with any weight fluctuation before their wedding.


The dress may have started out too small, but because of her weight loss, it ended up too big! So this is after we had added the corset back and taken her dress in once. Because of her weight loss, we actually needed to take it in a second time! You can see the pins are where we’re taking it in again.

We needed fabric for a modesty panel, which is the fabric that goes behind the corset ribbon. We thankfully were able to source the matching fabric from the remnants of cutting off her train. We checked our stash of leftover bits of dresses we collect when a bride doesn’t want something, and found material for the loops and a ribbon that matched her dress well.

Here, her dress is all finished and looking beautiful!
We’re always willing to do this for a bride to help make their dress fit and make their alterations as affordable as possible. But that doesn’t mean that it will work like this every time. If we hadn’t been able to source fabric from her train and had a ribbon that worked, we would have had to source the fabric elsewhere. Which would have added to the cost or unfortunately, not been possible. One final option for a bride who doesn’t have the fabric for the modesty panel that goes with a corset back is just not to have one. You can have just the ribbon criss-crossed across your back as a lace-up back. This will change the options for shapewear and bust support, which is something brides need to be aware of.

This bride’s dress came with this style back, and she actually decided to change it because it didn’t look or feel supportive.
Letting the shoulders out
Because we don’t wear formal wear all the time, sometimes when a bride thinks their dress doesn’t fit, the real problem is that the shoulders are too tight! When the shoulders are too tight, everything on the dress is pulled up. With the simple correction of letting out the shoulders, it can sometimes make everything fall back into place and be much closer to fitting. Part of the assessment process of figuring out the solutions for a dress is seeing if this option will help! If we see that the apex of a dress is hitting too high, it can mean the shoulders are too small. Sometimes the solution is adding support to the dress, or reworking the apex of the dress is another option.
One of our fabulous brides, Brye's dress had shoulders that were too small after having gone to a different seamstress for her initial alterations. There was nothing left in the shoulder seam allowance to let out for her, so we adjusted the straps and armholes to allow the straps to sit slightly off the shoulder.


Here you can see why we couldn’t let the straps out.


Here you can see where we are taking in the bust, which was the original problem with the dress.
The first seamstress’s decision to shorten the straps made the dress no longer fit properly. Because the shoulders were too short, the apex of her dress was completely off. While it may seem like an easy fix for some inexperienced seamstresses to do that, it actually isn’t. When the apex of the dress (which is typically the bust) is too high, it puts the space that is meant for the rib cage where the bust is. So the dimensions that are meant for the ribcage are now at the apex of the bust, and the apex of the dress is above the bust, making it not fit properly. The dress can no longer follow the natural shape of the body.

When we were finished, Brye looked gorgeous!
Our wonderful bride, Olivia C had bought a gorgeous vintage Tachi Castillo dress for her rehearsal dinner online. She was so in love with the timeless romance of this stunning dress, but it did not fit! The dress was about 6 inches from closing and didn’t sit correctly on her body. Olivia C thought the issue might be her broad shoulders. When we assessed the situation, we found that the dress was indeed too small in the shoulders but also too small overall. The main issue was the shoulders were too tight and made the waistband of the dress sit too high. It was hitting her bust in the wrong area.

Here you can see that the waistband is too high and not hitting her bust at the proper point.

This is how far the dress started out from closing!
Letting the shoulders out helped drop the waist into the correct area. We added gussets to the shoulders and let out the side seams as much as possible. This fix made the dress go from 6 inches away from closing to only 2 inches! The feminine ruffles and gathers of the dress helped hide the work being done on the shoulders. To get the dress the rest of the way there, we added a back princess seam and made a panel that was added between the princess seam and the zipper. Resident Wizard Bea didn’t need to make a pattern; she just made a panel similar to the original just 2 inches larger! The waistband of the dress was lengthened so it would still seamlessly go around the skirt of the dress.

You can see here what it would have looked like if the waistband had not been lengthened.

The waistband is being attached.
We had fabric to create a panel, gussets, and lengthen the waistband by hemming the skirt and sleeves. Overall, this dress was in amazing shape! It is by far the nicest vintage fabric we have ever worked on. When Olivia C’s dress was done, you would never know the amount of work that had been done to it! Giving new life to a vintage piece like this from a famous Mexican designer we admire is really something special!

Olivia's Dress looked fabulous finished!
Seam Allowances
Another option for making a dress larger is working with the dress's existing seam allowances. The seam allowances included in a dress depend on the dress style, fabric, and the designer. For example, we really LOVE Dany Tabet dresses. They are stunning and are great for our plus-size brides, but typically, there are very minimal seam allowances. Designers Maggie Sottero and Angel Rivera typically do have solid seam allowances! An example of a dress style that typically has small seam allowances would be one with an illusion bodice. This is because the designer does not want the seam allowances to show. Dresses with multiple layers can even have different amounts of seam allowances. So just because one layer has plenty does not mean all the other layers will have enough seam allowance. Sometimes the seam allowance is notched, which means you can’t let it out as much because there will be noticeable holes. The notches do serve a purpose, as they are typically there to allow the seam to curve better. Sometimes there will be notches at the armhole, waist, or hip seam to let the seam be less thick and bulky. This, of course, works well for making seams smooth and flat, but does not work for letting out a dress! The salespeople at the bridal boutiques should be able to check most dresses for the seam allowances.
Our gorgeous bride, Hannah, ordered her dress in the correct size for her body, but when she put it on, she found she could not breathe! This is obviously an important thing to be able to do. Because the dress had seam allowances, we were able to let it out enough for her to have breathing room.
To see how much it needed to be let out, we criss-crossed ribbons across the back of the dress to allow the bride to feel how the dress will feel when it is altered.

Next, we measured the seam allowance to see how much room we have to work with. Because Hannah’s dress had lace appliques, we were able to fill in most of the blank space that was caused from letting her dress out.

The finished back!

Here is Hannah’s dress fitting beautifully (and bustled)!
With our bride Olivia’s dress, it needed to be let out because it was too tight and the zipper was strained. A tight dress may look fine on your body when you try it on in a boutique. When you have to factor in sitting, moving, dancing, and breathing it will need to be let out for your comfort and stability of the dress!

Here you can see how much we are letting out the dress.
Typically, letting out the sides can naturally let out the armhole some, but depending on comfort, sometimes the armhole also needs to be widened as well. Because we also needed to shorten the straps quite a lot, we wanted to open the armhole up more to make sure she was comfortable.

The safety pins mark where we are altering the armhole to.

Here is where the straps needed to be taken in.
Olivia’s style of dress would have looked beautiful with a corset back but she wanted to keep the original design.


Here are the finished arm holes and the finished back of her gown!
For any dress that we are working on, we press over our new seams to make them flat and crisp. For a dress with clean lines like Olivia's that is made with crepe or satin, when we let it out, pressing is especially important because we want to get rid of the old stitch lines. Usually, they look good as new when we’re done! Sometimes we are not so lucky, and you can see the original stitch marks. This happened with our wonderful bride, Natalie. When we let out the back princess seam of her mother’s vintage wedding dress, you unfortunately can see the stitch marks. This problem is more common with vintage dresses like this because the stitching has been in the delicate fabric for so many years.

Here you can see the stitch marks before it has been pressed

Here they have been pressed, but are still visible
We do our best to fix the stitch marks when this happens, but sometimes not much can be done. We offered the option to add more lace to cover those areas, but she decided it was not super noticeable and was very happy with her gown.

Here it is all finished and looking beautiful! Unless you got VERY close to her gown and knew to look for the stitch marks, you wouldn’t know they were there.
An issue that comes up with our brides who have beaded dresses and need their gowns let out is that extra beads are not included. With our fabulous bride, Amanda, she also needed breathing room, just like Hannah. Her dress had extensive beading, but could be let out the right amount to allow her to breathe. The area we let it out needed to be re-beaded, particularly along the neckline edge. We needed to figure out where we could source those new beads from. Fine detail work, like beading, does add to the overall alterations expense because it is time-consuming, and we need to find matching beads from somewhere.

Here you can see how much the dress needs to be let out. This is also how much beading needs to be added!

In the end you couldn’t tell that we had let it out or added all of those beads back in!
Gussets
What is a gusset? A gusset is a piece of material that is sewn into a garment to enlarge it. Adding gussets is typically less work than some other options and is usually chosen when you want to keep the original dress design. The questions we ask ourselves when considering gussets are: How much fabric do we have? Will it work with the design? Are there other dress details we will need to be able to source? If illusion netting can be added to the design cohesively, it works well as a gusset. Illusion netting is cheaper than sourcing fabric and other accouterments like lace and beads from designers.

We didn’t make these illusion panels, but you can see here what it would look like added to the sides.
With gussets in particular, you can add more room to different areas of a dress. Sometimes the waist is the right size, but the bust is the wrong size, which is where using a gusset allows you to make that one area bigger. A gusset is like remaking a panel, but instead of adding on to a panel, a new one is created. Gussets are chosen more than adding a new panel to the gown because there is often less matching fabric available, so panels aren’t possible. Illusion mesh is added under the arm of the dress to add more room in that area. Illusion mesh is currently a popular trend, so it fits right in with modern dresses. This is not technically a gusset because it does noticeably alter the original design, but it is in the vein of a gusset. We haven’t done this method yet, but we do offer it as an option.
With our glowing bride, Susan, we added gussets to make her dress larger. Susan was very pregnant at the time of her wedding. She, like Leah, had bought her dress before COVID, had a small wedding, and postponed the big wedding until much later. By the time they were able to finally make their dream wedding happen, Susan was pregnant, so her perfect dress no longer fit. To create her gussets, we used some of her hem scrap and also “frankensteined” similar material together out of our stash.

Here you can see the fabric added to let out the dress. Without the beads to cover it this is what it would look like.
Bea painstakingly stitched the fabric and covered it with beading to make this happen. It is very fine detail work that takes a lot of patience. This is not the preferred way to do this; it just happened this way because we were working with such limited material.

Here is where Bea was putting the beading back on to cover the gussets. This area was about 4 or 5 different scraps of the beaded fabric put together!


Here, the dress is all finished and re–beaded!
This would not work on every dress style. With gussets, you can really work with just a little material and a lot of patience and make it look right! Susan was dying to wear this specific dress. She had bought a backup in case we couldn’t alter her dream dress, but she really did not love that one. Because Susan was pregnant, we had all of her fittings very close to the wedding so her figure would be less likely to keep changing.

Her dress came out so beautiful, you would never know there were secretly gussets!
For our bride and employee, Kelly, we also used gussets to make her dress the right size. She fell in love with a dress that was much too small, especially in the bust. To help the alterations process, she bought a second dress to have materials for us to source from. This sounds like it was an expensive option, but she actually got the second dress at a steep discount because the boutique she bought it from was permanently closing. So it was still a more budget-friendly option for her than getting a whole new gown. Adding gussets to her dress allowed the dress to look right in the front and the back with the design and embroidery placement. The integrity of the design remained intact. When you remake panels over making gussets, you have to keep in mind the original design of the dress. If you have enough fabric to remake panels, that is great, but if it can’t be done for the design, gussets are the next best option. The embroidery for Kelly’s dress covered the gussets perfectly.

Here you can see where Bea is planning where the embroidery will go to match the existing pattern and cover the shoulder gussets.

Here are some of the finished gussets! Kelly likes to call Bea a wizard when she sees a transformation like this.


In the end, you couldn’t tell we had enlarged her dress at all!
For Becoming Bridal bride Erin’s dress, we sourced the materials we needed for the gussets from the lining hems. That allowed for us to have enough matching dress material, but did not give us enough matching lace. Erin actually brought a second dress for us to use the lace from, but the lace sadly was not similar enough to go with her dress. We fortunately were able to get that from a bridal store that happened to have the same dress and was willing to place an order with the designer for the lace. With that lace, we were able to cover the gussets and continue the original lace design.

Here you can see us using a ribbon to show how the dress will feel when it is let out.
This shows the added material and is what the dress would look like if we did not cover where we let the dress out with lace!

Here is where we added the lace material over the lining, but before we added the lace applique.

Here is after we added the lace applique.
It is possible to incorporate a different style of lace if you absolutely have to. It would ideally be added throughout the entire dress to be cohesive, or it would look out of place if it is just over the gussets. Adding lace to the entire dress will add to the overall cost of alterations because it will be much more time-consuming.

Erin’s dress looked stunning on her when it was done!
Remaking Panels
When making panels, one of the major deciding factors is do we have enough fabric and any other necessary embellishments to create the panels! If you do have enough fabric and also have the time and budget, then we are good to go. If you have less fabric than needed, it is easier to make a gusset because it does not have to be oriented perfectly, unlike a panel. Panels allow you to keep the original design of the dress. We are essentially recreating the existing panel but making it larger. With brides like Susan and Erin, we only had little strips of fabric, so we could only create gussets. If you think there will be enough fabric from hem scraps, keep in mind that the fabric grain needs to match the grain of where it will be added to the dress. If the grain does not match, then you are out of luck! Like with all methods of letting a dress out, we usually use the criss-cross ribbon method to get an idea of how much we need to add.

We do this to allow the bride to feel what it will be like to have actual fabric there. If it was just open space, then a bride could not feel what the panel would feel like when it is finished. It also helps us to see the shape we need to create and where the new panel will work best. If the bust is still feeling too tight with the back open, we might try to replace a panel on the front of the dress, but if it feels good, we might replace a panel on the side or back of the dress.
For pregnant bridesmaid Shannon we took out a panel from the back of her dress and remade one that was bigger. Then she had the same amount of panels as before but the dress now fit her because of the enlarged panel. She ordered extra fabric when she ordered her bridesmaid dress because she was pregnant and she knew she would be far along at the point of the wedding. She really wanted to make sure her dress fit and still had the same design, so she bought a whole extra yard of fabric (in addition to sizing up) which we really appreciated! Her forward thinking allowed us to be able to do whatever we needed to make her dress fit.

Shannon even sent us a picture of the seam allowances in the dress
When we had her try the dress on to assess we saw it would luckily fit in the bust. After looking over the fit and factoring in her growing body we decided to remake a panel in the back because we had the needed fabric. If we did not have the fabric we would have had to do a gusset instead. Shannon wanted the dress to be as close to the original design to match the other bridesmaids and so she could sell the dress after the wedding. We chose doing the panel at the back because it was the easiest spot to adjust and we already had to reset the zipper to shorten the waist for her baby bump.


Here we are shortening the waist.
Since we would already have that part taken apart it made the most sense and saved time. The pleats at the front of the dress helped a lot to allow room. The pleats at the back of her gown also created more room so we released the pleats back there and reset them. The front twist of the dress stayed as it was designed because it went around the entire neckline of the dress. We could have replaced the whole thing but instead we added seams at the sides to be able to keep the design the same and save money. Though she was very prepared with the extra fabric she bought she did not bring extra lining fabric to let out the lining layer. This definitely isn’t something most people would think of needing. To source more fabric to let out the lining layer we hemmed the existing lining layer short. This allowed us to be able to have fabric to make a gusset for enlarging the lining layer in the back of the dress. The gusset is hidden inside where no one can see it and the finished panel covered it on the outside.


Shannon was a beautiful bridesmaid in her finished gown!
Our fabulous bride Bryn wanted to wear her mom’s wedding dress for her rehearsal dinner.

Here is Bryn in her wedding dress and her mom in her original wedding dress!
The dress fit her well except her cup size was larger than her mom’s. After assessing the dress’s fit we decided the best solution for her was to replace and remake the two side bust panels. On most dresses there are 3 pattern pieces that make up the front bodice. There's the center panel, then two side bust panels.

Before the dress fit.

The train we sourced material from.

Here we’ve made a pattern for the bust panel out of paper.

Here is a mock up of the bust panel on fabric.

Here is the mock-up of the panel being added. The mock-up worked so well it became the lining layer of the dress.

Here is after the panels are added in! You can see here how much better the bust fits than in the first photo.
We were also making the dress tea-length, so we were removing the whole train, which gave us plenty of fabric to work with! The neckline of the dress had beautiful trim that we needed to remove to work on the bust. Luckily, because just her cup size was bigger and not her neckline, we could add the trim back in and not need to piece in any extra pieces to make it fit.

Here is the trim waiting to be added back on
For another bride in a similar situation this is something to make sure to note. If there is something like trim that also needs to be enlarged that must be accounted for. Whether that means replacing it, removing it, or adding in pieces which may not be an exact match. This could change the design of the dress so it is very important to note. This is something that must be assessed on each individual dress. With a vintage piece like this we may not have been able to find matching trim because of the age. Vintage details can also be discolored over time so even if we had found the right trim the color may have been off. Because we had enough fabric to work from and didn’t need more trim it was pretty straight forward alteration. Without having enough matching fabric and also having the fabric on the right grain lines it would not have worked that way!


In the end, Bryn’s rehearsal dinner dress looked beautiful and fit like a glove!
No matter why or how much your dress needs to be enlarged, in the end, you will be a stunning bride! Brides of all sizes may need their dresses let out for any number of reasons. Dress sizes vary drastically between designers, and really, beauty has no size. Do not focus on the dress size or how much it needs to be let out. Instead, focus on how beautiful you look at your final fitting in your perfect fit!