
How to add additional coverage to your dress
Updated: Aug 28
At Becoming Bridal, our goal is for all of our brides to be comfortable and confident on their wedding day. It’s your body, and how much or how little of it you want to show is 100% your choice, and we’re here to support your vision. We want a bride with a plunging neckline to feel relaxed and not feel like they're spilling out or showing more than they desire. Sometimes a bride will want to customize the shape of their neckline to suit the amount of cleavage they want showing. We had a bride take her dress for her bridal portraits, and then when she got her photos back, she saw the level of cleavage in her portraits and did not like it. So she came back and had us fill in the neckline. It is all about individual comfort and how you want to look on your wedding day. That's where modesty panels come in! What is a modesty panel? Well, it is the fabric added in to cover whatever area a bride wants to cover. The idea of a modesty panel is that it allows for extra coverage to any desired area.
In the case of our bride M, she had a mesh panel on her dress that did not match her skin tone. Unfortunately, in the bridal industry, this is a common problem for brides of color.

Before we altered the mesh.
M originally wanted the mesh panel completely removed. We had to tell her, unfortunately, this was not possible because the structure this mesh panel provided was integral to the design of her dress. Her dress had a very open back, and keeping the mesh was necessary to keep the dress on her body.

The low back of the dress required the front mesh for support.
To demonstrate how the dress would feel without the mesh, we cut one side, and she agreed that it was much too flimsy that way! We tested out different shades of mesh and found one that complemented her skin tone perfectly. We added in the mesh lower than it was originally to complement where her bust naturally sat. Adding the mesh over her bust made it much too noticeable but adding it under her bust made it almost disappear! We added a double layer of the mesh to make it stronger and more supportive.
Before

After!

Look how the new mesh almost disappeared!
This is something for other brides to note: just because something doesn’t look like it is there for support and to add to the structure of the dress doesn’t mean it isn’t. It is best to always go to fittings with an open mind for what is physically possible for your dress. In the end, M looked absolutely radiant in her fabulous, fitted gown!

Our bride Karen came to us looking to add more coverage to her bust. She wasn’t looking to cover her cleavage completely, just to soften the amount visible, and was hoping more structure could be added.

This is when Karen was at the boutique and was already trying ways to cover up the mesh!
Her gown was second-hand, and the mesh that was there originally was small, the wrong color, and was puckering.

Here you can see the original mesh puckering, and the stitches are too loose.
So even if she had liked the style, we would have needed to fix this anyway! We had a fabric in our stash that was close to the mesh that was found on the back of the dress. We played with the fabric to see what looked like the best way to add the mesh to the design. She decided she liked the mesh crisscrossing across the bust to add more structure and also for more coverage.

This is where we tried the mesh straight across the neckline.

Here is where we were playing with the crisscrossing design.
This added just the right amount of coverage over the center of her cleavage without making it really heavy. Because we needed to replace the original mesh, we could give her more space in the neckline, so it wasn’t as strained as it had been. In the end, Karen was beautiful and supported in her wedding gown!
Before
After


With our bride Karina, she wanted her dress to have more coverage in the bust. She was a very conservative bride and was having a Catholic ceremony, which tends to be more on the traditional side.

Here you can see the sheer area she wanted filled in.

Here you can also see a bit more of the area that needs to be filled in.

This is where we’d begun to fill in the sheer areas. It made a huge difference!
To add more coverage, we filled in the neckline with lace pieces and lining fabric to make it no longer sheer. This is an excellent option for other brides wanting more coverage in the neckline. Though it is only the best option if lace and lining fabric are available to source from the dress so everything matched perfectly. Karina was petite, so we had leftover lace and lining layer to source from to carry the original integrity of the design of the gown throughout the alterations. For someone without extra embellishments, we can usually source similar fabric and lace. This is doable but is less ideal because it means we have to purchase more materials, which will cost the bride more and will require some design changes to the gown. We may have to add in the new lace and other adornments throughout the dress to make the design cohesive. While we had lace and lining fabric to work with for Karina's dress, we did not have enough beads. Her dress was a sample dress, so it was missing a fair portion of beads to begin with. We dug through our bead stash and found enough complementary beads to add them throughout the gown. In the end, Karina was very pleased with the coverage added to her dress and was a stunning bride!


For our bride Karissa, she had a V-shaped neckline that she liked, but the dress also had some cutouts in the bust with just netting that she did not care for.
Before we filled in the cutout.

To help her visualize what the additional coverage would look like, we started pinning in lace to fill in the netting areas and the neckline.

Here you can see where we started to pin in lace and some of the sheer areas we were adding in coverage for.
This also allowed us to understand how much coverage she was looking for. Many traditional modesty panels just add coverage straight across the bust, which completely changes the neckline. You already know we’re not about a one-size-fits-all fix, so that is not how we will ever do a modesty panel unless that's actually what a bride wants! By filling in the neckline the desired amount with lace, this keeps the original design of the neckline intact! It is so very important for all brides to communicate with their seamstress what design features they want to keep.

Here we were working on filling in the sheer area with lace. It required many pins and safety pins!

At this point, we had the design down, then came attaching all the lace!
For Karissa, we started with the lace higher on the neckline while playing with the individual pieces to see how to make the design complementary. We ended up angling the lace down to keep the V-neckline she was hoping to keep! Once we had all the lace placed, Karissa loved how it looked and that the design of the lace had movement. She ended up with a unique design that still provided the coverage she was looking for!
Before
After!
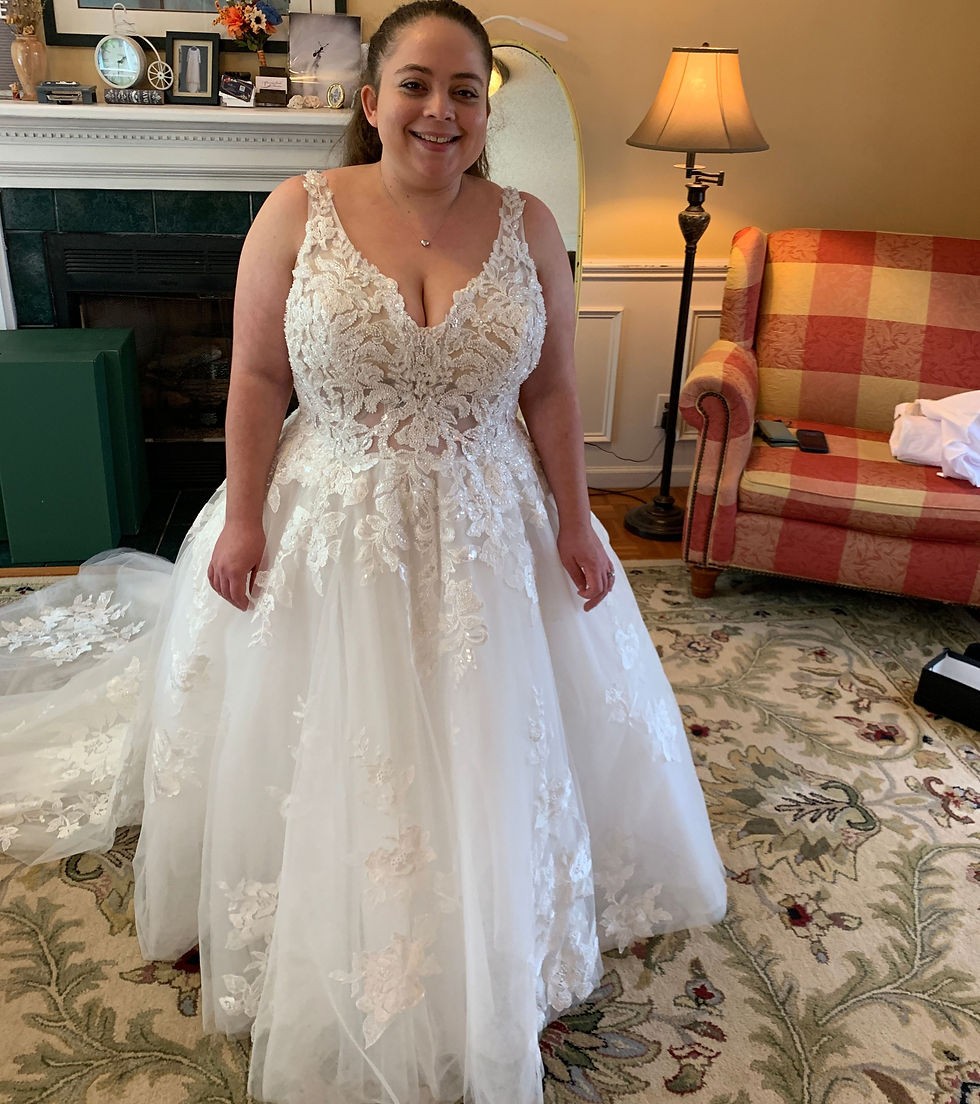
You’d never know we altered the neckline; it looked so natural in the end.
Our bride Ericka was looking for more coverage and support. The neckline of the dress was very wide, which meant there was zero fabric to add support for her bust.
Before we added support.

Our solution was to add mesh across the bust, which accomplished adding coverage and creating support! Who doesn’t love a double fix?! The mesh added tension to help the neckline feel more secure.

Here you can see where we pinned in the mesh.
Another reason the mesh was the perfect solution for this gown was that it actually already had mesh on the sides of the dress. So our added design element actually complemented an existing one!


The existing side mesh we matched.

They looked perfect all together!
This is a popular design feature many dresses have to soften the side of the bust and add structure. Because of her bust size, Ericka needed to purchase a larger dress so her gown would fit her. This meant the dress was the right size in the bust but large in other areas, so the dress needed to also be taken in and have the waist shortened.
Here you can see where the waist of the dress is being shortened, and the dress is being taken in.
In the end, Ericka looked very glamorous and supported on her wedding day!
Before
After


For bride Baylee, the end of her neckline had a mesh design feature that she did not care for.


Here you can see the mesh bit that Baylee didn’t like.
To alter her neckline, we started by layering the lace to fill in the mesh area. We were trying to figure out if all we needed to do was add in lace or if more was needed to add the desired coverage.

Here you can see all the pinned lace filling in the desired area.
Once we had added some lace, Baylee decided that the lace was a bit too sheer and wasn’t cutting it in the coverage department. We then used her lining layers behind the lace, and it became the exact right amount of coverage. Thankfully, we were able to source lace and lining fabric from hemming her skirts. This was not just a single piece of lining layer but lining layer, then a layer of glitter tulle, and then lace on top! We placed all of that on top of the original mesh piece that Baylee didn’t like.

The neckline has really come together here!
We decided not to remove this mesh piece because we were concerned that it would alter the structure of the dress by removing it. Baylee was all smiles on her wedding day with her dream neckline!
Before
After!

The neckline suited her perfectly!
With bride Kiersten, she wanted her neckline filled in to cover up a scar she had on her chest. For her, it wasn’t about erasing the scar, but she didn’t want it to be the focal point of her dress.

Before we added coverage.
When she was trying on dresses at the boutique, the associate helping her let her know that she could order netting to cover her scar. So when she came to her fitting, she was extremely prepared with matching netting all ready to go! We played with how many layers of netting to add to soften her scar but not completely erase it. We ended up landing on two layers of netting.


Here is where we were layering the netting to see what worked best as well as how high she wanted it to be.
This was a very straightforward fix, and it is so helpful when a bride brings in fabric that matches their unique skin tone! We can always source fabric elsewhere or pull from our stash, but the most cost-effective method for the bride is when she brings her own in, or we can source from the dress. Kiersten was confident and beautiful on her wedding day!
Before

After


No matter the reason a bride is looking for additional coverage, we’re here to make sure their vision becomes a reality!


Comments